Wednesday, August 15, 2012

More Zucchini in Nugget form!


I know that everyone has been missing my daily zucchini posts, so here is one more to feed your addiction.  

This was inspired by some broccoli nuggets we recently found in the freezer section of our local Whole Foods.  I figured that these couldn't be too hard to simulate, and what better to use than the huge abundance of zucchini we have! 


Happy Helper washing a zuke - note there are still quite a few behind her on the counter.


I made a couple batches of these - one with shredded squash, and one with ground zucchini.  I used my food processor to shred/grind both these.  


After you grind and/or shred, salt your product (1-2 tsp), mix, and let it sit in a colander for 15 minutes or so.  This helps draw out extra moisture.  As you see - from half of my giant zucchini, I collected about 1 cup of zuke juice.  Even after extracting this juice, my zucchini was still very wet.  

I saved this and put it in a smoothie the following day.


After the draining, I mixed in one egg, some Parmesan cheese (probably about 1/4 - 1/2 cup) and a dash of garlic powder, and Italian seasoning.


 I foiled a baking sheet, and using a cookie cutter, formed my mixture into heart shaped nuggets.


This symbolized my love for zucchini


Bake for about 25 minutes at 350.  Flip, then bake for 25 minutes more until crisp.


My kids, though skeptical at first, loved these.  I had quite a few extra, so they ended up in my freezer for lunchtime sometime in the future.  Definitely a great way to use up some of that extra summer harvest!

Monday, August 13, 2012

On to the next thing...

Where have I been?  Its been less than a week, but you are starving for more Zucchini?  Well, forget about it!  I'm not posting about zucchini today.  Maybe later this week, if we are up to eating zucchini again, but today I've got something really special in store.  *Spoiler alert*  This post may change your life.  You may 1.  Loose all respect for me; or 2.  Find a new addiction and thus loose all respect for yourself;  Or, 3.  You may have the self control of a Buddhist monk, and the post may not affect you at all.

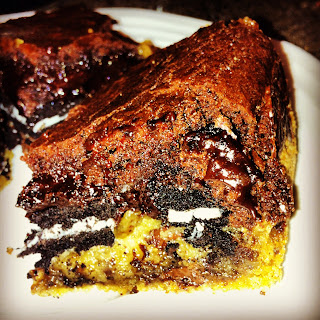
You are probably wondering what could possibly be so life altering and how have you not yet heard about it.  Well here it is my fine followers.   Feast your eyes upon this beauty of a treat:


Holy rusted metal, Batman!  


Ok, so I hear that if you use pintrest, you may already be aware of the infamous "Slutty brownie".  Me?  I don't use pintrest...  frankly I don't really get it, but that may just be me reaching that level of maturity where I don't understand new technology.  I also don't understand why Ryan Seacrest has a segment on the Olympics dedicated to Facebook & Twitter posts.  Does anyone really sit around and wonder how many people tweet about Michael Phelps?  Instead, you could be sitting around eating the total amount of calories Michael Phelps consumes in one day in one, efficient and delicious serving!


So as mentioned above, this post is about "Slutty Brownies".  I found these on the internet when looking for a new recipe for regular brownies.  If you weren't already convinced by my picture, let me give you a description.  These consist of a layer of chewy delicious chocolate chip cookie dough: 


Followed by a layer of everyone's favorite gay cookie, the Oreo:


And, finally, topped with a layer of super chocolaty, regular brownies.


When I first discovered these, so many things were going through my mind.  Who thought this was a good idea?  That can't possibly be good idea...  What kind of mother would serve these to her children?  No wonder we have so many obese Americans...  I need to go to the store to by Oreos.

Obviously, we made these.  And yes, they are so good.  Not in a decadent chocolate mousse souffle kinda way.  But more in a Taco Town Taco kind of way.  In all seriousness (as serious as this can get) I did make them with my kids, who really loved the multi-step process.  

Melting the butter
Measuring something yummy

Give it a good stir!

Adding the eggs

Adding the dry goods
Finishing up the cookie dough


 And they also really enjoyed eating them.


I'm not posting a recipe, because I don't necessarily want to recommend these.  I'm still not sure how morally feel about them.  But if you are like me and you want to give them a fair chance, there are lots of variations of these out there if you want to make your own - just search for "slutty brownies" and you are on your way.  But remember, in the interest of your own health, and America's obesity epidemic, I don't recommend making these very often.  After all, its not really fair to all the regular brownies.  


Wednesday, August 8, 2012

And now what???

Well, we went back to help out at the community garden a week after we received our initial stash, and lo and behold, more zucchini and squash!  While I love getting produce fresh from the garden, what are we going to do with tons and tons of this stuff?  (For the record, we also ended up with a huge stash of plums, jalapeno peppers, anaheim peppers, and a handful of cucumbers.)

Mom, this is heavy, can I please put it down now?

This is our second stash - and believe me, we could have gotten more if we wanted...


With this much stuff on hand, We decided to go ahead and freeze some of it so that we don't have to worry about eating it all right away.  The only reason that I didn't freeze all of it is that it takes up a lot of space, and we have a small freezer (and a lot of ice cream.  Ok, its not all ice cream, but regardless, our freezer is pretty full).

So the plan is, to slice the stuff up into pieces that will be easy to just throw into a meal sometime in the future.  For this round, I sliced my squash (one whole squash).  I cubed my zucchini.  (Sorry, no photo, but by now, you should know what cubed zucchini looks like)


I read somewhere online that zucchini & summer squash freezes best if you blanch it first.  This adds a little bit to the process, but better safe than sorry, right?  I planned to blanch the larger pieces for about two minutes and the smaller pieces for about one.  I also prepared an ice bath to drop them in afterward. 

Looks like my ice is melting, probably need to dig some more out of the back of my jam packed freezer...

Once your water is boiling, drop in your prepared veggies and boil for the predetermined time (Again, I did two minutes on these, one minute on my zukes.)


After they've been blanched, take them out and.... 


Drop them into your ice bath to cool and stop the cooking process.  After leaving them in the ice bath for a few minutes, I drained mine in a colander before putting them into serving-sized freezer bags. 

 Seriously, I need some more ice if I am calling this an ice bath.


This appears to have worked out really well.  I guess I can give you an update later in the year after we defrost some of this stuff for dinner.  Anyhow, I portioned mine prior to freezing so I can easily pull out and thaw one bag to throw into dinner.


 Now, we better go have some dessert so we can clear out more space in the freezer!

Tuesday, August 7, 2012

Zucchini Carrot Cake Overnight Oatmeal

If you've never made overnight oatmeal, you should definitely try it.  It is always great to wake up in the morning with breakfast ready and waiting.  Especially if no one has to wake up early to make it happen.  This is a slightly modified version of a recipe from "The Vegan Slow Cooker" cookbook.  (This was a gift to my husband, and I am SO glad I got it for him!  I use it all the time!)

One important thing - when making overnight oatmeal, you need steel cut oats.  Old fashioned or rolled oats are not the same and will turn into a pot of mush.  I can't stress enough - steel cut oats!


Here is what I used:


1 cup grated zucchini
1 grated carrot
1 cup steel cut oats
3 cups water
1 tablespoon Vanilla extract
1/4 cup brown sugar
1/2 teaspoon cinnamon
dash of ground cloves
dash of ground nutmeg
dash of salt

1 slow cooker (I think its 3 or 4 quart capacity?)


Here's what I did:

This recipe is super easy.  Really all you do is throw everything in a slow cooker, and turn it on.  Done!  Ok, I'll go into a little more detail.  I grated my zucchini and carrot right into the crock with my croc... er... GATOR grater!  

 Its grate to be a Florida Gator!!!


Here's what it looked like once I added all the ingredients.  Give it a good stir before putting the lid on top.  My slow cooker tends to run a little hot, so I left mine on "warm" all night long (about 8-9 hours).  When I woke up, I turned it to "low" for about 30 minutes or so.  It came out perfect!


And here is the finished product.  While my kiddos didn't finish all their breakfast, they both ate a good amount, so I count that as a success!  Plus, we woke up to our house smelling like we just baked a cake, only with a healthy breakfast waiting for us instead.


Monday, August 6, 2012

Zucchini Chips

What a great healthy snack - baked chips.  This recipe is super easy if you have a good way to uniformly and thinly slice your zucchini.  I used a mandolin, but I'm sure the slicing attachment to a food processor (or an extremely steady hand) would work just as well. 

After slicing up my zucchinis, my happy helper and I placed them on an oiled & foiled baking sheet.


I then sprayed the slices with some more cooking oil spray and sprinkled salt on top (not too much because these huge slices will really shrink!)


I made 2 trays of slices, so I decided to experiment a bit with one tray by adding a little bit of white balsamic.   I highly recommend this - just paint a little bit on each slice.  Super yum!


Now, set your oven to the lowest setting.  I started mine on warm, but after an hour or so I kicked it up a notch to 200.  This is a really slow process.  I probably kept mine in the oven for about 4 hours total.  


After they are done, you have some perfect zucchini chips.  Some of my thinner slices ended up with a hole in the middle where the seeds used to be, but that didn't affect the taste.  My 2 trays of slices ended up being about one serving of chips.  Like I said, they shrink way down.


This was really yummy, but is not a quick project!  I do recommend it for a lazy day snack!


Sunday, August 5, 2012

Zucchini and Squash Fajitas

Yum!  I love fajitas - and since we have "taco night" at least once a week in our house, this was a perfect addition to our weekly menu!

For this dish, I started with Green Peppers (also from our community garden) and an onion.  I would have preferred a red onion, but I just used what we had on-hand.


I started by slicing these up and softening them in a pan with some olive oil.


Next, I cut up about half a zucchini (probably equivalent to 2 regular zucchinis) and one yellow squash (again, probably about 2 normal sized squash).  I threw these in the pan with the onions and peppers.


I also found some mushrooms in our fridge - super bonus!  I sliced these up and threw them in with some minced garlic.  


Now, here is my super secret fajita seasoning. It really is super secret.  I don't even know the recipe because I make it up every time.  I usually use some combination of garlic powder, minced dried onion, cumin, paprika, chili powder, oregano, and coriander.  And of course salt and pepper.


After stirring in the fajita seasoning, it looked something like this and smelled AMAZING!  


Just wrap this up in a tortilla, and top with salsa and cheese for a delicious meal.  I got my daughter to eat some of this by simply turning hers into a quesadilla.  We will definitely be doing this meal again! 


Saturday, August 4, 2012

Zucchini Pizza

One of the things we like to make with zucchini is raw lasagna, but, don't get too excited because that's not what this entry is about.  As I was preparing (really just mentally) to make the lasagna for dinner, Josie asked if we could have pizza instead.  At first I was thinking, no way Jose (Josie/Jose get it? ha ha), but after more consideration, I thought, Why not?  She's got a better chance of eating something she thinks is pizza than raw zucchini lasagna.

This is another one that I pretty much made up as I went along.  I started by slicing up the zucchini into thin strips for the "crust".  Remember how my zucchinis are ginormous...


Next I placed them on a baking sheet lined with foil, and drizzled oil on each side and sprinkled with garlic salt.  I baked these a little while (maybe 5-10 minutes) at about 350.


I was just about to open a jar of sauce, but lucky for me, I found some leftover spaghetti sauce in the fridge! I spread the sauce over the top of the "crusts" and then topped with cheese.  I used colby jack (aka "cloud cheese" in my house).  This was only because we didn't have any other cheese (except non-dairy).


I baked these for another 10-15 minutes, until the sauce was warm and the cheese was melty.  Looks like a delicious, kid-friendly meal right?  Well my one year old loved it and ate it all up.  And my four year old?  Remember how she was the one who inspired this dish?  Well, she ate one bite and decided she was done.  One is better than none, right?


I made a slight modification for the adult version which was really great.  I started out the same, but rather than topping with sauce and cheese, I topped with fresh vine ripe tomatoes and broiled them up until charred.  Then I brushed a little oil and vinegar on, and for me, a little bit of shredded Parmigiano-Reggiano (not my husband - poor guy can't eat dairy).  


This meal was definitely better than I expected.  Pretty impressive for throwing it together last minute!